转载自:http://blog.csdn.net/briblue/article/details/54973413
不知道大家有没有发现,不管是Bootstrap ClassLoader还是ExtClassLoader等,这些类加载器都只是加载指定的目录下的jar包或者资源。如果在某种情况下,我们需要动态加载一些东西呢?比如从D盘某个文件夹加载一个class文件,或者从网络上下载class主内容然后再进行加载,这样可以吗?
如果要这样做的话,需要我们自定义一个classloader。
自定义步骤
- 编写一个类继承自ClassLoader抽象类。
- 复写它的
findClass()方法。 - 在
findClass()方法中调用defineClass()。
defineClass()
这个方法在编写自定义classloader的时候非常重要,它能将class二进制内容转换成Class对象,如果不符合要求的会抛出各种异常。
注意点:
一个ClassLoader创建时如果没有指定parent,那么它的parent默认就是AppClassLoader。
上面说的是,如果自定义一个ClassLoader,默认的parent父加载器是AppClassLoader,因为这样就能够保证它能访问系统内置加载器加载成功的class文件。
自定义ClassLoader示例之DiskClassLoader。
假设我们需要一个自定义的classloader,默认加载路径为D:\lib下的jar包和资源。
我们写编写一个测试用的类文件,Test.java
Test.java
package com.frank.test;

public class Test {

    public void say(){
        System.out.println("Say Hello");
    }

}- 1
- 2
- 3
- 4
- 5
- 6
- 7
- 8
- 9
- 1
- 2
- 3
- 4
- 5
- 6
- 7
- 8
- 9
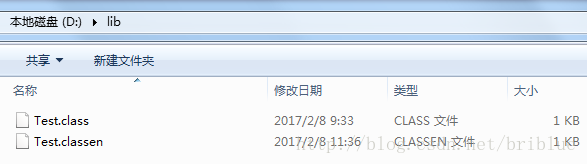
然后将它编译过年class文件Test.class放到D:\lib这个路径下。
DiskClassLoader
我们编写DiskClassLoader的代码。
import java.io.ByteArrayOutputStream;
import java.io.File;
import java.io.FileInputStream;
import java.io.FileNotFoundException;
import java.io.IOException;


public class DiskClassLoader extends ClassLoader {

    private String mLibPath;

    public DiskClassLoader(String path) {
        // TODO Auto-generated constructor stub
        mLibPath = path;
    }

    @Override
    protected Class<?> findClass(String name) throws ClassNotFoundException {
        // TODO Auto-generated method stub

        String fileName = getFileName(name);

        File file = new File(mLibPath,fileName);

        try {
            FileInputStream is = new FileInputStream(file);

            ByteArrayOutputStream bos = new ByteArrayOutputStream();
            int len = 0;
            try {
                while ((len = is.read()) != -1) {
                    bos.write(len);
                }
            } catch (IOException e) {
                e.printStackTrace();
            }

            byte[] data = bos.toByteArray();
            is.close();
            bos.close();

            return defineClass(name,data,0,data.length);

        } catch (IOException e) {
            // TODO Auto-generated catch block
            e.printStackTrace();
        }

        return super.findClass(name);
    }

    //获取要加载 的class文件名
    private String getFileName(String name) {
        // TODO Auto-generated method stub
        int index = name.lastIndexOf('.');
        if(index == -1){
            return name+".class";
        }else{
            return name.substring(index)+".class";
        }
    }

}- 1
- 2
- 3
- 4
- 5
- 6
- 7
- 8
- 9
- 10
- 11
- 12
- 13
- 14
- 15
- 16
- 17
- 18
- 19
- 20
- 21
- 22
- 23
- 24
- 25
- 26
- 27
- 28
- 29
- 30
- 31
- 32
- 33
- 34
- 35
- 36
- 37
- 38
- 39
- 40
- 41
- 42
- 43
- 44
- 45
- 46
- 47
- 48
- 49
- 50
- 51
- 52
- 53
- 54
- 55
- 56
- 57
- 58
- 59
- 60
- 61
- 62
- 63
- 1
- 2
- 3
- 4
- 5
- 6
- 7
- 8
- 9
- 10
- 11
- 12
- 13
- 14
- 15
- 16
- 17
- 18
- 19
- 20
- 21
- 22
- 23
- 24
- 25
- 26
- 27
- 28
- 29
- 30
- 31
- 32
- 33
- 34
- 35
- 36
- 37
- 38
- 39
- 40
- 41
- 42
- 43
- 44
- 45
- 46
- 47
- 48
- 49
- 50
- 51
- 52
- 53
- 54
- 55
- 56
- 57
- 58
- 59
- 60
- 61
- 62
- 63
我们在findClass()方法中定义了查找class的方法,然后数据通过defineClass()生成了Class对象。
测试
现在我们要编写测试代码。我们知道如果调用一个Test对象的say方法,它会输出”Say Hello”这条字符串。但现在是我们把Test.class放置在应用工程所有的目录之外,我们需要加载它,然后执行它的方法。具体效果如何呢?我们编写的DiskClassLoader能不能顺利完成任务呢?我们拭目以待。
import java.lang.reflect.InvocationTargetException;
import java.lang.reflect.Method;

public class ClassLoaderTest {

    public static void main(String[] args) {
        // TODO Auto-generated method stub

        //创建自定义classloader对象。
        DiskClassLoader diskLoader = new DiskClassLoader("D:\\lib");
        try {
            //加载class文件
            Class c = diskLoader.loadClass("com.frank.test.Test");

            if(c != null){
                try {
                    Object obj = c.newInstance();
                    Method method = c.getDeclaredMethod("say",null);
                    //通过反射调用Test类的say方法
                    method.invoke(obj, null);
                } catch (InstantiationException | IllegalAccessException
                        | NoSuchMethodException
                        | SecurityException |
                        IllegalArgumentException |
                        InvocationTargetException e) {
                    // TODO Auto-generated catch block
                    e.printStackTrace();
                }
            }
        } catch (ClassNotFoundException e) {
            // TODO Auto-generated catch block
            e.printStackTrace();
        }

    }

}
- 1
- 2
- 3
- 4
- 5
- 6
- 7
- 8
- 9
- 10
- 11
- 12
- 13
- 14
- 15
- 16
- 17
- 18
- 19
- 20
- 21
- 22
- 23
- 24
- 25
- 26
- 27
- 28
- 29
- 30
- 31
- 32
- 33
- 34
- 35
- 36
- 37
- 38
- 1
- 2
- 3
- 4
- 5
- 6
- 7
- 8
- 9
- 10
- 11
- 12
- 13
- 14
- 15
- 16
- 17
- 18
- 19
- 20
- 21
- 22
- 23
- 24
- 25
- 26
- 27
- 28
- 29
- 30
- 31
- 32
- 33
- 34
- 35
- 36
- 37
- 38
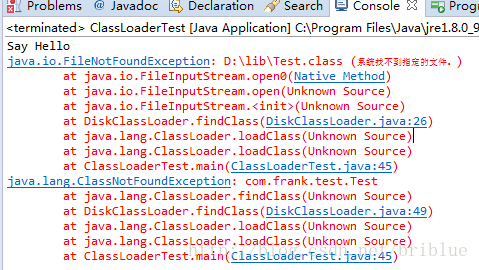
我们点击运行按钮,结果显示。

可以看到,Test类的say方法正确执行,也就是我们写的DiskClassLoader编写成功。
回首
讲了这么大的篇幅,自定义ClassLoader才姗姗来迟。 很多同学可能觉得前面有些啰嗦,但我按照自己的思路,我觉得还是有必要的。因为我是围绕一个关键字进行讲解的。
关键字是什么?
关键字 路径
- 从开篇的环境变量
- 到3个主要的JDK自带的类加载器
- 到自定义的ClassLoader
它们的关联部分就是路径,也就是要加载的class或者是资源的路径。
BootStrap ClassLoader、ExtClassLoader、AppClassLoader都是加载指定路径下的jar包。如果我们要突破这种限制,实现自己某些特殊的需求,我们就得自定义ClassLoader,自已指定加载的路径,可以是磁盘、内存、网络或者其它。
所以,你说路径能不能成为它们的关键字?
当然上面的只是我个人的看法,可能不正确,但现阶段,这样有利于自己的学习理解。
自定义ClassLoader还能做什么?
突破了JDK系统内置加载路径的限制之后,我们就可以编写自定义ClassLoader,然后剩下的就叫给开发者你自己了。你可以按照自己的意愿进行业务的定制,将ClassLoader玩出花样来。
玩出花之Class解密类加载器
常见的用法是将Class文件按照某种加密手段进行加密,然后按照规则编写自定义的ClassLoader进行解密,这样我们就可以在程序中加载特定了类,并且这个类只能被我们自定义的加载器进行加载,提高了程序的安全性。
下面,我们编写代码。
1.定义加密解密协议
加密和解密的协议有很多种,具体怎么定看业务需要。在这里,为了便于演示,我简单地将加密解密定义为异或运算。当一个文件进行异或运算后,产生了加密文件,再进行一次异或后,就进行了解密。
2.编写加密工具类
import java.io.File;
import java.io.FileInputStream;
import java.io.FileNotFoundException;
import java.io.FileOutputStream;
import java.io.IOException;


public class FileUtils {

    public static void test(String path){
        File file = new File(path);
        try {
            FileInputStream fis = new FileInputStream(file);
            FileOutputStream fos = new FileOutputStream(path+"en");
            int b = 0;
            int b1 = 0;
            try {
                while((b = fis.read()) != -1){
                    //每一个byte异或一个数字2
                    fos.write(b ^ 2);
                }
                fos.close();
                fis.close();
            } catch (IOException e) {
                // TODO Auto-generated catch block
                e.printStackTrace();
            }
        } catch (FileNotFoundException e) {
            // TODO Auto-generated catch block
            e.printStackTrace();
        }
    }

}
- 1
- 2
- 3
- 4
- 5
- 6
- 7
- 8
- 9
- 10
- 11
- 12
- 13
- 14
- 15
- 16
- 17
- 18
- 19
- 20
- 21
- 22
- 23
- 24
- 25
- 26
- 27
- 28
- 29
- 30
- 31
- 32
- 33
- 34
- 35
- 1
- 2
- 3
- 4
- 5
- 6
- 7
- 8
- 9
- 10
- 11
- 12
- 13
- 14
- 15
- 16
- 17
- 18
- 19
- 20
- 21
- 22
- 23
- 24
- 25
- 26
- 27
- 28
- 29
- 30
- 31
- 32
- 33
- 34
- 35
我们再写测试代码
FileUtils.test("D:\\lib\\Test.class");- 1
- 1
然后可以看见路径D:\\lib\\Test.class下Test.class生成了Test.classen文件。
编写自定义classloader,DeClassLoader
import java.io.ByteArrayOutputStream;
import java.io.File;
import java.io.FileInputStream;
import java.io.IOException;


public class DeClassLoader extends ClassLoader {

    private String mLibPath;

    public DeClassLoader(String path) {
        // TODO Auto-generated constructor stub
        mLibPath = path;
    }

    @Override
    protected Class<?> findClass(String name) throws ClassNotFoundException {
        // TODO Auto-generated method stub

        String fileName = getFileName(name);

        File file = new File(mLibPath,fileName);

        try {
            FileInputStream is = new FileInputStream(file);

            ByteArrayOutputStream bos = new ByteArrayOutputStream();
            int len = 0;
            byte b = 0;
            try {
                while ((len = is.read()) != -1) {
                    //将数据异或一个数字2进行解密
                    b = (byte) (len ^ 2);
                    bos.write(b);
                }
            } catch (IOException e) {
                e.printStackTrace();
            }

            byte[] data = bos.toByteArray();
            is.close();
            bos.close();

            return defineClass(name,data,0,data.length);

        } catch (IOException e) {
            // TODO Auto-generated catch block
            e.printStackTrace();
        }

        return super.findClass(name);
    }

    //获取要加载 的class文件名
    private String getFileName(String name) {
        // TODO Auto-generated method stub
        int index = name.lastIndexOf('.');
        if(index == -1){
            return name+".classen";
        }else{
            return name.substring(index+1)+".classen";
        }
    }

}- 1
- 2
- 3
- 4
- 5
- 6
- 7
- 8
- 9
- 10
- 11
- 12
- 13
- 14
- 15
- 16
- 17
- 18
- 19
- 20
- 21
- 22
- 23
- 24
- 25
- 26
- 27
- 28
- 29
- 30
- 31
- 32
- 33
- 34
- 35
- 36
- 37
- 38
- 39
- 40
- 41
- 42
- 43
- 44
- 45
- 46
- 47
- 48
- 49
- 50
- 51
- 52
- 53
- 54
- 55
- 56
- 57
- 58
- 59
- 60
- 61
- 62
- 63
- 64
- 65
- 1
- 2
- 3
- 4
- 5
- 6
- 7
- 8
- 9
- 10
- 11
- 12
- 13
- 14
- 15
- 16
- 17
- 18
- 19
- 20
- 21
- 22
- 23
- 24
- 25
- 26
- 27
- 28
- 29
- 30
- 31
- 32
- 33
- 34
- 35
- 36
- 37
- 38
- 39
- 40
- 41
- 42
- 43
- 44
- 45
- 46
- 47
- 48
- 49
- 50
- 51
- 52
- 53
- 54
- 55
- 56
- 57
- 58
- 59
- 60
- 61
- 62
- 63
- 64
- 65
测试
我们可以在ClassLoaderTest.java中的main方法中如下编码:
DeClassLoader diskLoader = new DeClassLoader("D:\\lib");
        try {
            //加载class文件
            Class c = diskLoader.loadClass("com.frank.test.Test");

            if(c != null){
                try {
                    Object obj = c.newInstance();
                    Method method = c.getDeclaredMethod("say",null);
                    //通过反射调用Test类的say方法
                    method.invoke(obj, null);
                } catch (InstantiationException | IllegalAccessException
                        | NoSuchMethodException
                        | SecurityException |
                        IllegalArgumentException |
                        InvocationTargetException e) {
                    // TODO Auto-generated catch block
                    e.printStackTrace();
                }
            }
        } catch (ClassNotFoundException e) {
            // TODO Auto-generated catch block
            e.printStackTrace();
}- 1
- 2
- 3
- 4
- 5
- 6
- 7
- 8
- 9
- 10
- 11
- 12
- 13
- 14
- 15
- 16
- 17
- 18
- 19
- 20
- 21
- 22
- 23
- 24
- 1
- 2
- 3
- 4
- 5
- 6
- 7
- 8
- 9
- 10
- 11
- 12
- 13
- 14
- 15
- 16
- 17
- 18
- 19
- 20
- 21
- 22
- 23
- 24
查看运行结果是:
可以看到了,同样成功了。现在,我们有两个自定义的ClassLoader:DiskClassLoader和DeClassLoader,我们可以尝试一下,看看DiskClassLoader能不能加载Test.classen文件也就是Test.class加密后的文件。
我们首先移除D:\\lib\\Test.class文件,只剩下一下Test.classen文件,然后进行代码的测试。
DeClassLoader diskLoader1 = new DeClassLoader("D:\\lib");
        try {
            //加载class文件
            Class c = diskLoader1.loadClass("com.frank.test.Test");

            if(c != null){
                try {
                    Object obj = c.newInstance();
                    Method method = c.getDeclaredMethod("say",null);
                    //通过反射调用Test类的say方法
                    method.invoke(obj, null);
                } catch (InstantiationException | IllegalAccessException
                        | NoSuchMethodException
                        | SecurityException |
                        IllegalArgumentException |
                        InvocationTargetException e) {
                    // TODO Auto-generated catch block
                    e.printStackTrace();
                }
            }
        } catch (ClassNotFoundException e) {
            // TODO Auto-generated catch block
            e.printStackTrace();
        }

        DiskClassLoader diskLoader = new DiskClassLoader("D:\\lib");
        try {
            //加载class文件
            Class c = diskLoader.loadClass("com.frank.test.Test");

            if(c != null){
                try {
                    Object obj = c.newInstance();
                    Method method = c.getDeclaredMethod("say",null);
                    //通过反射调用Test类的say方法
                    method.invoke(obj, null);
                } catch (InstantiationException | IllegalAccessException
                        | NoSuchMethodException
                        | SecurityException |
                        IllegalArgumentException |
                        InvocationTargetException e) {
                    // TODO Auto-generated catch block
                    e.printStackTrace();
                }
            }
        } catch (ClassNotFoundException e) {
            // TODO Auto-generated catch block
            e.printStackTrace();
        }

    }
- 1
- 2
- 3
- 4
- 5
- 6
- 7
- 8
- 9
- 10
- 11
- 12
- 13
- 14
- 15
- 16
- 17
- 18
- 19
- 20
- 21
- 22
- 23
- 24
- 25
- 26
- 27
- 28
- 29
- 30
- 31
- 32
- 33
- 34
- 35
- 36
- 37
- 38
- 39
- 40
- 41
- 42
- 43
- 44
- 45
- 46
- 47
- 48
- 49
- 50
- 51
- 52
- 1
- 2
- 3
- 4
- 5
- 6
- 7
- 8
- 9
- 10
- 11
- 12
- 13
- 14
- 15
- 16
- 17
- 18
- 19
- 20
- 21
- 22
- 23
- 24
- 25
- 26
- 27
- 28
- 29
- 30
- 31
- 32
- 33
- 34
- 35
- 36
- 37
- 38
- 39
- 40
- 41
- 42
- 43
- 44
- 45
- 46
- 47
- 48
- 49
- 50
- 51
- 52
运行结果:
我们可以看到。DeClassLoader运行正常,而DiskClassLoader却找不到Test.class的类,并且它也无法加载Test.classen文件。
Context ClassLoader 线程上下文类加载器
前面讲到过Bootstrap ClassLoader、ExtClassLoader、AppClassLoader,现在又出来这么一个类加载器,这是为什么?
前面三个之所以放在前面讲,是因为它们是真实存在的类,而且遵从”双亲委托“的机制。而ContextClassLoader其实只是一个概念。
查看Thread.java源码可以发现
public class Thread implements Runnable {

/* The context ClassLoader for this thread */
   private ClassLoader contextClassLoader;

   public void setContextClassLoader(ClassLoader cl) {
       SecurityManager sm = System.getSecurityManager();
       if (sm != null) {
           sm.checkPermission(new RuntimePermission("setContextClassLoader"));
       }
       contextClassLoader = cl;
   }

   public ClassLoader getContextClassLoader() {
       if (contextClassLoader == null)
           return null;
       SecurityManager sm = System.getSecurityManager();
       if (sm != null) {
           ClassLoader.checkClassLoaderPermission(contextClassLoader,
                                                  Reflection.getCallerClass());
       }
       return contextClassLoader;
   }
}- 1
- 2
- 3
- 4
- 5
- 6
- 7
- 8
- 9
- 10
- 11
- 12
- 13
- 14
- 15
- 16
- 17
- 18
- 19
- 20
- 21
- 22
- 23
- 24
- 1
- 2
- 3
- 4
- 5
- 6
- 7
- 8
- 9
- 10
- 11
- 12
- 13
- 14
- 15
- 16
- 17
- 18
- 19
- 20
- 21
- 22
- 23
- 24
contextClassLoader只是一个成员变量,通过setContextClassLoader()方法设置,通过getContextClassLoader()设置。
每个Thread都有一个相关联的ClassLoader,默认是AppClassLoader。并且子线程默认使用父线程的ClassLoader除非子线程特别设置。
我们同样可以编写代码来加深理解。
现在有2个SpeakTest.class文件,一个源码是
package com.frank.test;

public class SpeakTest implements ISpeak {

    @Override
    public void speak() {
        // TODO Auto-generated method stub
        System.out.println("Test");
    }

}
- 1
- 2
- 3
- 4
- 5
- 6
- 7
- 8
- 9
- 10
- 11
- 12
- 1
- 2
- 3
- 4
- 5
- 6
- 7
- 8
- 9
- 10
- 11
- 12
它生成的SpeakTest.class文件放置在D:\\lib\\test目录下。
另外ISpeak.java代码
 package com.frank.test;

public interface ISpeak {
    public void speak();

}- 1
- 2
- 3
- 4
- 5
- 6
- 1
- 2
- 3
- 4
- 5
- 6
然后,我们在这里还实现了一个SpeakTest.java
package com.frank.test;

public class SpeakTest implements ISpeak {

    @Override
    public void speak() {
        // TODO Auto-generated method stub
        System.out.println("I\' frank");
    }

}- 1
- 2
- 3
- 4
- 5
- 6
- 7
- 8
- 9
- 10
- 11
- 1
- 2
- 3
- 4
- 5
- 6
- 7
- 8
- 9
- 10
- 11
它生成的SpeakTest.class文件放置在D:\\lib目录下。
然后我们还要编写另外一个ClassLoader,DiskClassLoader1.java这个ClassLoader的代码和DiskClassLoader.java代码一致,我们要在DiskClassLoader1中加载位置于D:\\lib\\test中的SpeakTest.class文件。
测试代码:
DiskClassLoader1 diskLoader1 = new DiskClassLoader1("D:\\lib\\test");
Class cls1 = null;
try {
//加载class文件
 cls1 = diskLoader1.loadClass("com.frank.test.SpeakTest");
System.out.println(cls1.getClassLoader().toString());
if(cls1 != null){
    try {
        Object obj = cls1.newInstance();
        //SpeakTest1 speak = (SpeakTest1) obj;
        //speak.speak();
        Method method = cls1.getDeclaredMethod("speak",null);
        //通过反射调用Test类的speak方法
        method.invoke(obj, null);
    } catch (InstantiationException | IllegalAccessException
            | NoSuchMethodException
            | SecurityException |
            IllegalArgumentException |
            InvocationTargetException e) {
        // TODO Auto-generated catch block
        e.printStackTrace();
    }
}
} catch (ClassNotFoundException e) {
// TODO Auto-generated catch block
e.printStackTrace();
}

DiskClassLoader diskLoader = new DiskClassLoader("D:\\lib");
System.out.println("Thread "+Thread.currentThread().getName()+" classloader: "+Thread.currentThread().getContextClassLoader().toString());
new Thread(new Runnable() {

    @Override
    public void run() {
        System.out.println("Thread "+Thread.currentThread().getName()+" classloader: "+Thread.currentThread().getContextClassLoader().toString());

        // TODO Auto-generated method stub
        try {
            //加载class文件
        //  Thread.currentThread().setContextClassLoader(diskLoader);
            //Class c = diskLoader.loadClass("com.frank.test.SpeakTest");
            ClassLoader cl = Thread.currentThread().getContextClassLoader();
            Class c = cl.loadClass("com.frank.test.SpeakTest");
            // Class c = Class.forName("com.frank.test.SpeakTest");
            System.out.println(c.getClassLoader().toString());
            if(c != null){
                try {
                    Object obj = c.newInstance();
                    //SpeakTest1 speak = (SpeakTest1) obj;
                    //speak.speak();
                    Method method = c.getDeclaredMethod("speak",null);
                    //通过反射调用Test类的say方法
                    method.invoke(obj, null);
                } catch (InstantiationException | IllegalAccessException
                        | NoSuchMethodException
                        | SecurityException |
                        IllegalArgumentException |
                        InvocationTargetException e) {
                    // TODO Auto-generated catch block
                    e.printStackTrace();
                }
            }
        } catch (ClassNotFoundException e) {
            // TODO Auto-generated catch block
            e.printStackTrace();
        }
    }
}).start();
- 1
- 2
- 3
- 4
- 5
- 6
- 7
- 8
- 9
- 10
- 11
- 12
- 13
- 14
- 15
- 16
- 17
- 18
- 19
- 20
- 21
- 22
- 23
- 24
- 25
- 26
- 27
- 28
- 29
- 30
- 31
- 32
- 33
- 34
- 35
- 36
- 37
- 38
- 39
- 40
- 41
- 42
- 43
- 44
- 45
- 46
- 47
- 48
- 49
- 50
- 51
- 52
- 53
- 54
- 55
- 56
- 57
- 58
- 59
- 60
- 61
- 62
- 63
- 64
- 65
- 66
- 67
- 68
- 69
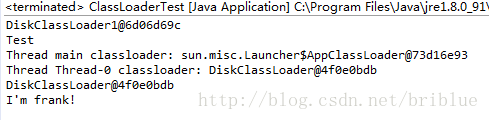
结果如下:
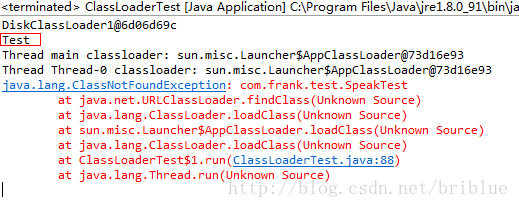
我们可以得到如下的信息:
1. DiskClassLoader1加载成功了SpeakTest.class文件并执行成功。
2. 子线程的ContextClassLoader是AppClassLoader。
3. AppClassLoader加载不了父线程当中已经加载的SpeakTest.class内容。
我们修改一下代码,在子线程开头处加上这么一句内容。
Thread.currentThread().setContextClassLoader(diskLoader1);- 1
- 1
结果如下:
可以看到子线程的ContextClassLoader变成了DiskClassLoader。
继续改动代码:
Thread.currentThread().setContextClassLoader(diskLoader);
- 1
- 2
- 1
- 2
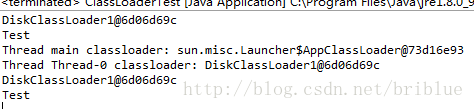
结果:
可以看到DiskClassLoader1和DiskClassLoader分别加载了自己路径下的SpeakTest.class文件,并且它们的类名是一样的com.frank.test.SpeakTest,但是执行结果不一样,因为它们的实际内容不一样。
Context ClassLoader的运用时机
其实这个我也不是很清楚,我的主业是Android,研究ClassLoader也是为了更好的研究Android。网上的答案说是适应那些Web服务框架软件如Tomcat等。主要为了加载不同的APP,因为加载器不一样,同一份class文件加载后生成的类是不相等的。如果有同学想多了解更多的细节,请自行查阅相关资料。